User management microservice (Part 5): Authentication with JWT tokens and Spring Security

So far the business logic, data access layer and the REST API had been build, however enforcing authentication was completely missing. As Spring Security became the de-facto standard when is comes to building authentication and authorization into a Java web application, I’ll be using that. In this fifth part I show you how Spring Security can be used with JWT tokens, another technology gaining traction nowadays.
1. About JWT tokens
JSON Web Token (JWT) is an open standard (RFC 7519) that defines a compact and self-contained way
for securely transmitting information between parties as a JSON object. This information can be verified and trusted
because it is digitally signed.
JWT is getting traction nowadays, because it’s lightweight in that sense that you don’t need to have an authentication
server for validating tokens. This might be an advantage compared to OAuth for instance, and also a drawback. If a
JWT token gets intercepted, it can be used to impersonate the user and there is no trivial way to deny authentication
with that compromised token.
This is how a JWT token looks like.
eyJhbGciOiJIUzI1NiIsInR5cCI6IkpXVCJ9.
eyJzdWIiOiJsYXN6bG9fQVRfc3ByaW5ndW5pX0RPVF9jb20iLCJuYW1lIjoiTMOhc3psw7MgQ3NvbnRvcyIsImFkbWluIjp0cnVlfQ.
XEfFHwFGK0daC80EFZBB5ki2CwrOb7clGRGlzchAD84
The first part is the token’s header which identifies the token’s type and the algorithm used to sign the token.
{
 "alg": "HS256",
 "typ": "JWT"
}
The second part is the JWT token’s payload or its claims. There’s a distinction between these two. A payload can be
an arbitrary set of data, it can be even plaintext or another (nested JWT). Claims on the other hand are a standard set of fields.
{
 "sub": "laszlo_AT_springuni_DOT_com",
 "name": "László Csontos",
 "admin": true
}
The third part is the signature created by that algorithm that the JWT’s header denotes.
2. Creating and validating JWT tokens
There are quite a few 3rd party libraries with which you can manipulate JWT tokens. In this guide I used
JJWT.
<dependency>
    <groupId>io.jsonwebtoken</groupId>
    <artifactId>jjwt</artifactId>
    <version>0.7.0</version>
</dependency>
In the app JwtTokenService
is responsible for creating JWT tokens from an
Authentication
instances and parsing a JWTs back to an
Authentication
instances.
public class JwtTokenServiceImpl implements JwtTokenService {

  private static final String AUTHORITIES = "authorities";

  static final String SECRET = "ThisIsASecret";

  @Override
  public String createJwtToken(Authentication authentication, int minutes) {
    Claims claims = Jwts.claims()
        .setId(String.valueOf(IdentityGenerator.generate()))
        .setSubject(authentication.getName())
        .setExpiration(new Date(currentTimeMillis() + minutes * 60 * 1000))
        .setIssuedAt(new Date());

    String authorities = authentication.getAuthorities()
        .stream()
        .map(GrantedAuthority::getAuthority)
        .map(String::toUpperCase)
        .collect(Collectors.joining(","));

    claims.put(AUTHORITIES, authorities);

    return Jwts.builder()
        .setClaims(claims)
        .signWith(HS512, SECRET)
        .compact();
  }

  @Override
  public Authentication parseJwtToken(String jwtToken) throws AuthenticationException {
    try {
      Claims claims = Jwts.parser()
            .setSigningKey(SECRET)
            .parseClaimsJws(jwtToken)
            .getBody();

      return JwtAuthenticationToken.of(claims);
    } catch (ExpiredJwtException | SignatureException e) {
      throw new BadCredentialsException(e.getMessage(), e);
    } catch (UnsupportedJwtException | MalformedJwtException e) {
      throw new AuthenticationServiceException(e.getMessage(), e);
    } catch (IllegalArgumentException e) {
      throw new InternalAuthenticationServiceException(e.getMessage(), e);
    }
  }

}
Method parseClaimsJws() throws various exceptions depending on the actual validation issue. In parseJwtToken() the
thrown exceptions are translated back to
AuthenticationExceptions.
Although
JwtAuthenticationEntryPoint
would be able to translate these exceptions to various HTTP response codes, it just re-uses
DefaultAuthenticationFailureHandler
to respond with HTTP 401 (Unauthorized).
3. Login and Authentication Process
Basically the authentication process has got two phrases given the fact that the back-end will serve a single page web application.
3.1. Creating a JWT token upon login
First login is initiated and over the course of that a JWT token is created and sent back to the client. This is done with following request.
POST /session
{
  "username": "laszlo_AT_sprimguni_DOT_com",
  "password": "secret"
}
After a successful login the client sends subsequent request to other endpoints as usual providing the locally cached JWT token in
the Authorization header, like this: Authorization: Bearer <JWT token>.
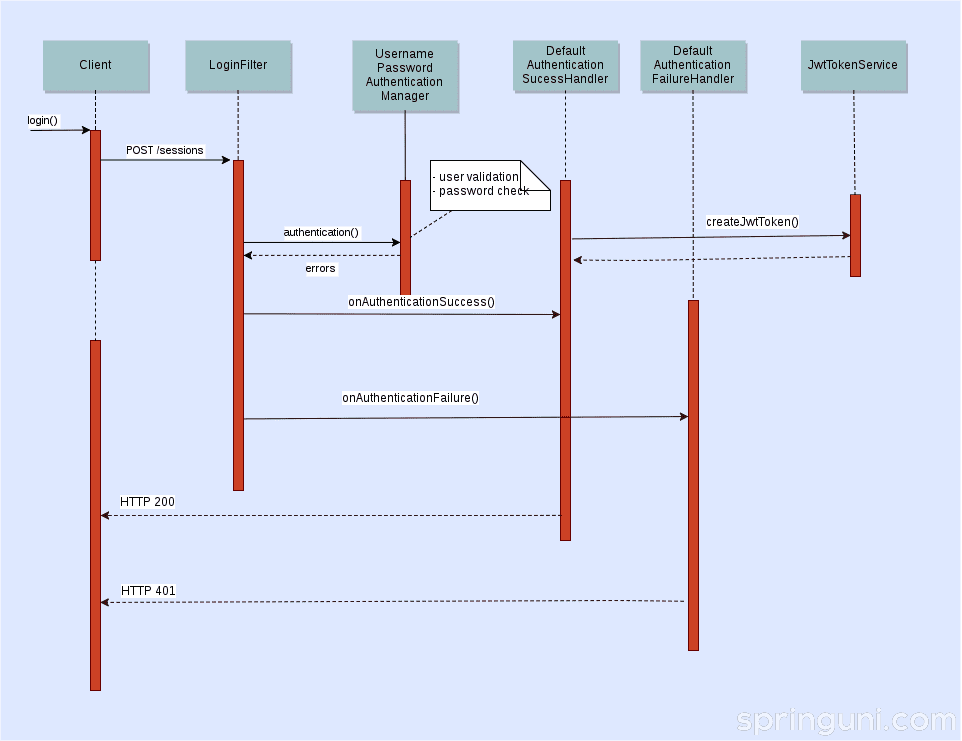
As you can see on the figure above,
LoginFilter
commences the login process. Spring Security’s built-in
UsernamePasswordAuthenticationFilter
was extended to make this happen. The only difference is that
UsernamePasswordAuthenticationFilter
uses form parameters to capture the username and password, in contrast
LoginFilter
expects them as a JSON object above.
import org.springframework.security.authentication.*;
import org.springframework.security.core.*;
import org.springframework.security.web.authentication.*;

public class LoginFilter extends UsernamePasswordAuthenticationFilter {

  private static final String LOGIN_REQUEST_ATTRIBUTE = "login_request";

  ...

  @Override
  public Authentication attemptAuthentication(
      HttpServletRequest request, HttpServletResponse response) throws AuthenticationException {

    try {
      LoginRequest loginRequest =
          objectMapper.readValue(request.getInputStream(), LoginRequest.class);

      request.setAttribute(LOGIN_REQUEST_ATTRIBUTE, loginRequest);

      return super.attemptAuthentication(request, response);
    } catch (IOException ioe) {
      throw new InternalAuthenticationServiceException(ioe.getMessage(), ioe);
    } finally {
      request.removeAttribute(LOGIN_REQUEST_ATTRIBUTE);
    }
  }

  @Override
  protected String obtainUsername(HttpServletRequest request) {
    return toLoginRequest(request).getUsername();
  }

  @Override
  protected String obtainPassword(HttpServletRequest request) {
    return toLoginRequest(request).getPassword();
  }

  private LoginRequest toLoginRequest(HttpServletRequest request) {
    return (LoginRequest)request.getAttribute(LOGIN_REQUEST_ATTRIBUTE);
  }

}
Handling the outcome of the login process is then delegated to an AuthenticationSuccessHandler and AuthenticationFailureHandler.
Both of them are fairly simple. DefaultAuthenticationSuccessHandler calls JwtTokenService to issue a new token and then sends it back to the client.
public class DefaultAuthenticationSuccessHandler implements AuthenticationSuccessHandler {

  private static final int ONE_DAY_MINUTES = 24 * 60;

  private final JwtTokenService jwtTokenService;
  private final ObjectMapper objectMapper;

  public DefaultAuthenticationSuccessHandler(
      JwtTokenService jwtTokenService, ObjectMapper objectMapper) {

    this.jwtTokenService = jwtTokenService;
    this.objectMapper = objectMapper;
  }

  @Override
  public void onAuthenticationSuccess(
      HttpServletRequest request, HttpServletResponse response, Authentication authentication)
      throws IOException {

    response.setContentType(APPLICATION_JSON_VALUE);

    String jwtToken = jwtTokenService.createJwtToken(authentication, ONE_DAY_MINUTES);
    objectMapper.writeValue(response.getWriter(), jwtToken);
  }

}
Its counterpart, DefaultAuthenticationFailureHandler,
just sends back an HTTP 401 error message.
public class DefaultAuthenticationFailureHandler implements AuthenticationFailureHandler {

  private static final Logger LOGGER =
      LoggerFactory.getLogger(DefaultAuthenticationFailureHandler.class);

  private final ObjectMapper objectMapper;

  public DefaultAuthenticationFailureHandler(ObjectMapper objectMapper) {
    this.objectMapper = objectMapper;
  }

  @Override
  public void onAuthenticationFailure(
      HttpServletRequest request, HttpServletResponse response, AuthenticationException exception)
      throws IOException {

    LOGGER.warn(exception.getMessage());

    HttpStatus httpStatus = translateAuthenticationException(exception);

    response.setStatus(httpStatus.value());
    response.setContentType(APPLICATION_JSON_VALUE);

    writeResponse(response.getWriter(), httpStatus, exception);
  }

  protected HttpStatus translateAuthenticationException(AuthenticationException exception) {
    return UNAUTHORIZED;
  }

  protected void writeResponse(
      Writer writer, HttpStatus httpStatus, AuthenticationException exception) throws IOException {

    RestErrorResponse restErrorResponse = RestErrorResponse.of(httpStatus, exception);
    objectMapper.writeValue(writer, restErrorResponse);
  }

}
3.2. Handling subsequent requests
After the client had performed a login, it caches the JWT token locally and sends it back for subsequent requests as discussed above.
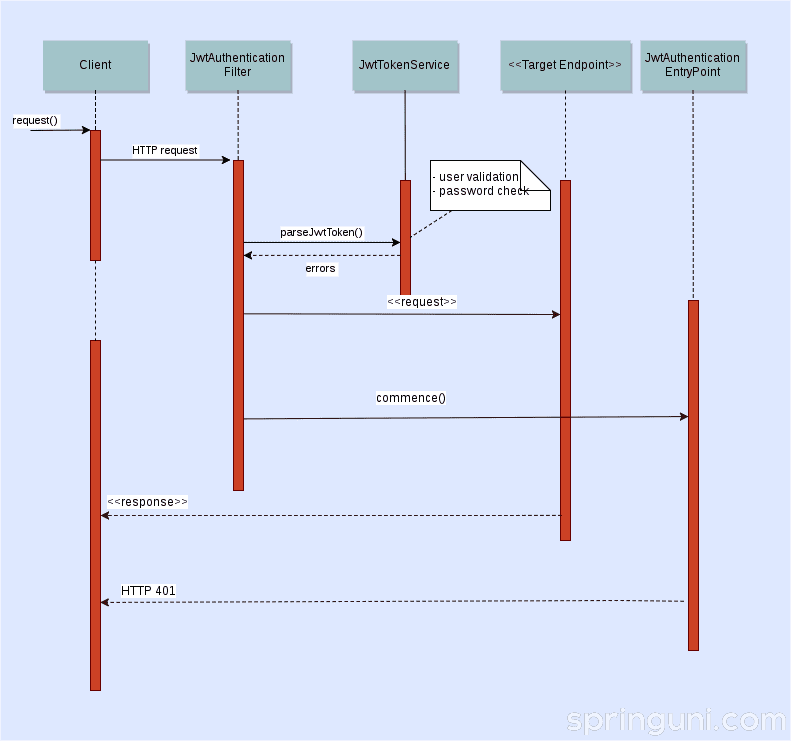
For every request JwtAuthenticationFilter
validates the received JWT token through
JwtTokenService.
public class JwtAuthenticationFilter extends OncePerRequestFilter {

  private static final Logger LOGGER =
      LoggerFactory.getLogger(JwtAuthenticationFilter.class);

  private static final String AUTHORIZATION_HEADER = "Authorization";
  private static final String TOKEN_PREFIX = "Bearer";

  private final JwtTokenService jwtTokenService;

  public JwtAuthenticationFilter(JwtTokenService jwtTokenService) {
    this.jwtTokenService = jwtTokenService;
  }

  @Override
  protected void doFilterInternal(HttpServletRequest request, HttpServletResponse response,
      FilterChain filterChain) throws ServletException, IOException {

    Authentication authentication = getAuthentication(request);
    if (authentication == null) {
      SecurityContextHolder.clearContext();
      filterChain.doFilter(request, response);
      return;
    }

    try {
      SecurityContextHolder.getContext().setAuthentication(authentication);
      filterChain.doFilter(request, response);
    } finally {
      SecurityContextHolder.clearContext();
    }
  }

  private Authentication getAuthentication(HttpServletRequest request) {
    String authorizationHeader = request.getHeader(AUTHORIZATION_HEADER);
    if (StringUtils.isEmpty(authorizationHeader)) {
      LOGGER.debug("Authorization header is empty.");
      return null;
    }

    if (StringUtils.substringMatch(authorizationHeader, 0, TOKEN_PREFIX)) {
      LOGGER.debug("Token prefix {} in Authorization header was not found.", TOKEN_PREFIX);
      return null;
    }

    String jwtToken = authorizationHeader.substring(TOKEN_PREFIX.length() + 1);

    try {
      return jwtTokenService.parseJwtToken(jwtToken);
    } catch (AuthenticationException e) {
      LOGGER.warn(e.getMessage());
      return null;
    }
  }

}
If the token is valid, a JwtAuthenticationToken
is instantiated and put the executing thread’s
SecurityContext.
As the recovered JWT token contains the unique ID and the authorities of authenticated users, there’s no need to reach out
to the database to fetch this information again.
public class JwtAuthenticationToken extends AbstractAuthenticationToken {

  private static final String AUTHORITIES = "authorities";

  private final long userId;

  private JwtAuthenticationToken(long userId, Collection<? extends GrantedAuthority> authorities) {
    super(authorities);
    this.userId = userId;
  }

  @Override
  public Object getCredentials() {
    return null;
  }

  @Override
  public Long getPrincipal() {
    return userId;
  }

  /**
   * Factory method for creating a new {@code {@link JwtAuthenticationToken}}.
   * @param claims JWT claims
   * @return a JwtAuthenticationToken
   */
  public static JwtAuthenticationToken of(Claims claims) {
    long userId = Long.valueOf(claims.getSubject());

    Collection<GrantedAuthority> authorities =
        Arrays.stream(String.valueOf(claims.get(AUTHORITIES)).split(","))
            .map(String::trim)
            .map(String::toUpperCase)
            .map(SimpleGrantedAuthority::new)
            .collect(Collectors.toSet());

    JwtAuthenticationToken jwtAuthenticationToken = new JwtAuthenticationToken(userId, authorities);

    Date now = new Date();
    Date expiration = claims.getExpiration();
    Date notBefore = claims.getNotBefore();
    jwtAuthenticationToken.setAuthenticated(now.after(notBefore) && now.before(expiration));

    return jwtAuthenticationToken;
  }

}
After this point it’s up to the security framework to decide if it allows or rejects the request.
4. Does Spring Security have a contender in the Java EE world?
Although this isn’t the main topic of the article, I wanted to contemplate on it for a minute. What if I had had to do all of this in a Java EE app? Is Spring Security really is a gold standard of implementing authentication and authorization in Java?
Let’s make a little research.
Knowing that Java EE 8 is around the corner and it’s expected to be released at the end of 2017, I wanted to see if it’s going
to be a serious contender to Spring Security. What I
found was that
Java EE 8 will provide JSR-375 which is supposed to ease the development
of security measures of Java EE apps. Its reference implementation is called Soteira,
a relatively new project on GitHub. That said, the answer at the moment is no.
This research wouldn’t be complete without mentioning Apache Shiro. Although I haven’t
used it yet, but I see people claiming that it’s simpler then Spring Security. It’s also
possible to use it with JWT tokens.
From that perspective Apache Shiro is a comparable alternative to Spring Security.
5. Conclusion
We've learned what JWT tokens are and how to create and validate them. Through a comprehensive example with Spring Security, we've also seen how to implement a JWT-based login and authentication process.
6. Next in this series
Join my Newsletter
If you like Java and Spring as much as I do, sign up for my newsletter.