How to consume large SQS messages with JMS and Spring Boot

Spring Boot became ubiquitous in recent years and provided an opinionated way of integrating various pieces of technology. Working with JMS is no exception to that. Altought Amazon has got it own Java API for interacting with SQS, using it through JMS ensures that we’ll be able to use the same piece of code with another messaging infrastructure. After taking a look at a basic message consumer and producer setup, we dive into a more advanced use case, which is consuming large messages.
Get the working example
If you’re like most people, perhaps you’d like to see the big picture first and go into the details after that. I prepared a fully working example, which is available on GitHub and here you go.
% git clone git@github.com:craftingjava/craftingjava-examples.git
% cd spring-boot/spring-jms-sqs
Create a local configuration file .env with the following contents in the root of the project (spring-jms-sqs).
AMAZON_SQS_ENDPOINT=https://sqs.us-east-1.amazonaws.com/XXXXXXX/queue-name
AMAZON_SQS_ACCESS_KEY=XXXXXXXX
AMAZON_SQS_SECRET_KEY=XXXXXXXX
AMAZON_SQS_EXT_S3_ACCESS_KEY=XXXXXXXX
AMAZON_SQS_EXT_S3_SECRET_KEY=XXXXXXXX
AMAZON_SQS_EXT_S3_BUCKET_NAME=queue-name-large-payloads
After starting the demo app, it will listen on port 5000. I would have liked to keep it simple and it just handles bare text messages. Spring’s automated message converter infrastructure doesn’t play a role here, as the article’s focus is how to deal with large SQS messages.
% mvn spring-boot:run
% curl -H 'Content-Type: text/plain' http://localhost:5000/message -XPOST -d 'test'
If everything went well, you should see the following messages.
2017-08-09 19:13:01.443 INFO 29525 --- [nio-5000-exec-1] c.s.examples.jms.MessageProducer : Sending message test.
2017-08-09 19:13:02.069 INFO 29525 --- [nio-5000-exec-1] c.a.s.javamessaging.SQSMessageProducer : Message sent to SQS with SQS-assigned messageId: 1001f7ba-55fc-4bdb-8732-8f4d40343068
2017-08-09 19:13:02.069 INFO 29525 --- [nio-5000-exec-1] com.amazon.sqs.javamessaging.SQSSession : Shutting down SessionCallBackScheduler executor
2017-08-09 19:13:02.243 INFO 29525 --- [enerContainer-1] c.s.examples.jms.MessageConsumer : Received message test
I’m hoping you’re still with me and interested in seeing the details.
Nuances of working with SQS
SQS is an odd-one out from the point of view how message brokers operate in general.
SQS maximizes the size of messages at 256K
For exchanging data in larger chunks than that can be achieved in various ways. When I first faced this limitation, I applied gzip compression and encoded the compressed binary data with base64. That solution worked just fine for textual (JSON) data, however it required customization on both the producer’s and the consumer’s side. Furthermore compression itself doesn’t guarantee that the size of messages to be sent will never exceed the 256K limit. Amazon SDK provides an extended SQS client, which enables end users to exchange messages larger than 256K transparently without having to apply customization themselves. The extened SQS client leverages S3 for storing messages and only a reference to the stored object is being sent to queues.
SQS isn’t transactional
However, Spring Boot tries to set up JmsListenerContainerFactory as transactional. When JMS autoconfiguration is enabled JmsAnnotationDrivenConfiguration delegates configuring a DefaultJmsListenerContainerFactory to DefaultJmsListenerContainerFactoryConfigurer and that expects either a JtaTransactionManager be present or is set the container factory’s sessionTransacted property to true.
Annotation driven message listener configuration requires the queue name to be defined upfront
Arbitrary methods of a managed bean can be annotated with @JmsListener(destination = "queueName") or alternatively javax.jms.MessageListener can be implemented instead. Nevertheless, going for the first option is much more convenient as Spring intelligently converts the received message to various user defined data type through its MessageConverter infrastructure.
In SQS endpoint URLs identify queues and they also contain the queue’s name.
Such an URL looks like this: https://sqs.<region>.amazonaws.com/<acctount- id>/<queue-name>.
Obviously, we can extract the queue name from an URL like this, however the way JMS can be setup with Spring Boot requires you to define the queue’s name directly.
In order to do be able to leverage Spring’s messaging infrastructure without having to hard code a JMS destination in the message consumer or having to repeat the queue’s name in the application’s configuration, we need to implement a custom DestinationResolver. That DestinationResolver will eventually parse the endpoints URL of a SQS queue and we’ll have to fiddle with only a single application property.
Basic setup with SQS
We continue from that point where Messaging with JMS left off. That guide doesn’t configure ConnectionFactory explicitely in which case Spring Boot configures and embedded ActiveMQ broker.
Maven dependencies
For the showcasing how Amazon’s JMS messaging library plays with Spring, we need to setup the following dependencies.
<dependencies>
  <dependency>
    <groupId>com.amazonaws</groupId>
    <artifactId>amazon-sqs-java-extended-client-lib</artifactId>
    <version>${amazon-sqs-java-extended-client-lib.version}</version>
  </dependency>

  <dependency>
    <groupId>com.amazonaws</groupId>
    <artifactId>amazon-sqs-java-messaging-lib</artifactId>
    <version>${amazon-sqs-java-messaging-lib.version}</version>
  </dependency>

  <dependency>
    <groupId>org.springframework</groupId>
    <artifactId>spring-jms</artifactId>
  </dependency>

  <dependency>
    <groupId>org.springframework.boot</groupId>
    <artifactId>spring-boot-starter-web</artifactId>
  </dependency>
</dependencies>
Basically amazon-sqs-java-extended-client-lib is only required if you would like to send large messages and 256K might not be enough. For basic use cases however, you can omit that.
The example is using spring-boot-starter-web, because we produce and consume messages in the same application. Real world solutions however have these functionalities separated.
Producing JMS messages
For the sake of simplicity, we’ll be exchanging simple text messages. The aforementioned official Spring tutorial covers sending structured messages and it also explains how JSON messages are getting converted to/from simple Java POJOs.
We’re however focusing on the details of integrating SQS as our message broker instead.
For producing messages a simple REST controller (MessageProducer) is used which in turn puts the HTTP request’s body to an SQS queue. It’s fairly trivial to do just that, eventually there’s nothing specific to SQS in that piece of code.
@RestController
@Slf4j
public class MessageProducer {

  private final JmsOperations jmsTemplate;

  @Autowired
  public MessageProducer(JmsOperations jmsTemplate) {
    this.jmsTemplate = jmsTemplate;
  }

  @PostMapping("/message")
  public ResponseEntity sendMessage(@RequestBody String message) {
    log.info("Sending message {}.", message);
    jmsTemplate.convertAndSend(message);
    return ResponseEntity.ok().build();
  }

}
Receiving JMS messages
Altought receiving messages (MessageConsumer) looks equally trivial at a first sight, the challenge here was to eliminate the requirement of having to define a hard-coded message destination.
@Component
@Slf4j
public class MessageConsumer {

  @JmsListener(destination = "")
  public void receive(@Payload String message) {
    log.info("Received message {}.", message);
  }

}
Spring gives support for resolving destinations based on that destination name which is supplied by the destination attribute of the @JmsListener annotation (DynamicDestinationResolver). As the application is listening on messages coming from a single queue, we don’t want to do that. Instead the queue’s name is to be determined at that time when the application boots.
StaticDestinationResolver gets initialized with a fixed queue name and it resolves destinations against that same queue name every time.
public class StaticDestinationResolver implements DestinationResolver {

  private final String queueName;

  public StaticDestinationResolver(String queueName) {
    this.queueName = queueName;
  }

  @Override
  public Destination resolveDestinationName(
      Session session, String destinationName, boolean pubSubDomain) throws JMSException {

    return session.createQueue(queueName);
  }

}
SQS configuration
SqsProperties encapsulate all of the required properties required for creating an SQS client. Basically we need to define an AWS region, queue endpoint URL and AWS access/secret keys, thought the two latter can be omitted if the underlying EC2 container has got the necessary IAM roles.
@Data
@ConfigurationProperties(prefix = "amazon.sqs")
public class SqsProperties {

  private String region;
  private String endpoint;
  private String accessKey;
  private String secretKey;

  private Integer numberOfMessagesToPrefetch;

  private Extended extended = new Extended();

  public Optional<Integer> getNumberOfMessagesToPrefetch() {
    return Optional.ofNullable(numberOfMessagesToPrefetch);
  }

  public String getQueueName() {
    URI endpointUri = URI.create(endpoint);
    String path = endpointUri.getPath();
    int pos = path.lastIndexOf('/');
    return path.substring(pos + 1);
  }

  @Data
  public static class Extended {

    private String s3Region;
    private String s3BucketName;
    private String s3AccessKey;
    private String s3SecretKey;

  }

}
In application.yml these properties are mapped to individual, upper cased application configuration options. Most of the time these kind of applications are deployed on EB (Elasticbeantalk) or ECS (Elastic Container Services) which supply configuration data as environment variables.
All of the configurations steps below are taken from AbstractSqsConfiguration. They were implemented as reusable building blocks and we would be inspecting them one-by-one in what follows.
Creating an AWS credentials provider
Connecting to AWS usually starts with authenticating to one of its services. As I mentioned above, the steps of having to supply access and secret keys can be omitted in case of IAM roles, yet creating an AWSCredentialsProvider (one way or another) is necessary.
private AWSCredentialsProvider createAwsCredentialsProvider(
    String localAccessKey, String localSecretKey) {

  AWSCredentialsProvider ec2ContainerCredentialsProvider =
      new EC2ContainerCredentialsProviderWrapper();

  if (StringUtils.isEmpty(localAccessKey) || StringUtils.isEmpty(localSecretKey)) {
    return ec2ContainerCredentialsProvider;
  }

  AWSCredentialsProvider localAwsCredentialsProvider =
      new AWSStaticCredentialsProvider(
          new BasicAWSCredentials(localAccessKey, localSecretKey));

  return new AWSCredentialsProviderChain(
      localAwsCredentialsProvider, ec2ContainerCredentialsProvider);
}
When access and secret keys are supplied we try to authenticate with those static credentials first with a fallback to fetching credentials from ECS directly.
Creating a SQS client
Once we have an AWSCredentialsProvider at hand, using the AmazonSQSClientBuilder for making a client instance is straight forward.
private AmazonSQS createAmazonSQSClient(SqsProperties sqsProperties) {
  Regions region = Regions.fromName(sqsProperties.getRegion());

  EndpointConfiguration endpointConfiguration = new EndpointConfiguration(
      sqsProperties.getEndpoint(), region.getName());

  AWSCredentialsProvider awsCredentialsProvider = createAwsCredentialsProvider(
      sqsProperties.getAccessKey(),
      sqsProperties.getSecretKey()
  );

  return AmazonSQSClientBuilder
      .standard()
      .withCredentials(awsCredentialsProvider)
      .withEndpointConfiguration(endpointConfiguration)
      .build();
}
Creating a SQS connection factory
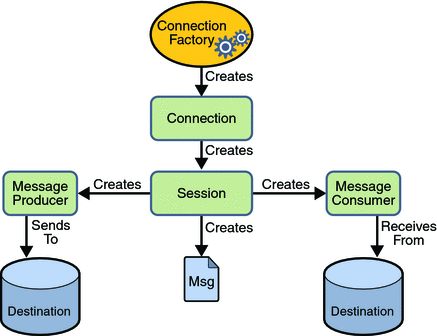
JMS programming model (figure created by javatpoint.com)
SQSConnectionFactory is the concrete implementation of javax.jms.ConnectionFactory and as such it’s the gateway between the standard JMS API and native access to SQS through its Java SDK.
protected SQSConnectionFactory createStandardSQSConnectionFactory(SqsProperties sqsProperties) {
  AmazonSQS sqsClient = createAmazonSQSClient(sqsProperties);

  ProviderConfiguration providerConfiguration = new ProviderConfiguration();
  sqsProperties.getNumberOfMessagesToPrefetch()
      .ifPresent(providerConfiguration::setNumberOfMessagesToPrefetch);

  return new SQSConnectionFactory(providerConfiguration, sqsClient);
}
After we’ve had an AmazonSQSClient instance created in the former step, we need a ProviderConfiguration object as well in order to set the number of message to be pre-fetched.
JMS configuration
Spring Boot makes working with JMS very easy. Under normal circumstances it’s perfectly enough to create register a single javax.jms.ConnectionFactory bean and then it takes care of creating a message listener container and a JmsTemplate.
@Bean
@Override
public ConnectionFactory connectionFactory(SqsProperties sqsProperties) {
  return createStandardSQSConnectionFactory(sqsProperties);
}
In case of SQS however, there some nuances we should take care of ourselves. I mentioned that SQS wasn’t transactional, but Spring Boot’s autoconfiguration mechanism tried to create a listener container factory that way. JmsTemplate needs a destination and and that can be extracted from the given SQS endpoint URL and also it’s more convenient to have the queue name resolved automatically in contrast to having to hard-code it with @JmsListner.
@Bean
public DestinationResolver destinationResolver(SqsProperties sqsProperties) {
  return new StaticDestinationResolver(sqsProperties.getQueueName());
}

@Bean
public JmsListenerContainerFactory<?> jmsListenerContainerFactory(
    ConnectionFactory connectionFactory, DestinationResolver destinationResolver) {

  DefaultJmsListenerContainerFactory jmsListenerContainerFactory =
      new DefaultJmsListenerContainerFactory();
  jmsListenerContainerFactory.setConnectionFactory(connectionFactory);
  jmsListenerContainerFactory.setDestinationResolver(destinationResolver);
  jmsListenerContainerFactory.setSessionTransacted(false);

  return jmsListenerContainerFactory;
}

@Bean
public JmsTemplate jmsTemplate(
    SqsProperties sqsProperties, ConnectionFactory connectionFactory) {

  JmsTemplate jmsTemplate = new JmsTemplate(connectionFactory);
  jmsTemplate.setDefaultDestinationName(sqsProperties.getQueueName());
  return jmsTemplate;
}
Using the SQS extended client
We’ve convered how to setup a basic JMS config, if you want to produce and consume message larger than 256K, keep reading.
Creating an S3 client
Amazon SQS client relies on S3 as a means of persisting large messages and only a reference is sent over SQS. In order to be able to leverage S3, a bucket and credetials for accessing S3 are required. The following piece of code demonstrates how an AmazonS3Client can be built.
private AmazonS3 createAmazonS3Client(SqsProperties sqsProperties) {
  AWSCredentialsProvider awsCredentialsProvider = createAwsCredentialsProvider(
      sqsProperties.getAccessKey(),
      sqsProperties.getSecretKey()
  );

  Regions region = Regions.fromName(sqsProperties.getRegion());

  AmazonS3 amazonS3Client = AmazonS3ClientBuilder
      .standard()
      .withCredentials(awsCredentialsProvider)
      .withRegion(region)
      .build();

  String s3BucketName = sqsProperties.getExtended().getS3BucketName();

  if (!amazonS3Client.doesBucketExist(s3BucketName)) {
    amazonS3Client.createBucket(s3BucketName);

    BucketLifecycleConfiguration.Rule expirationRule =
        new BucketLifecycleConfiguration.Rule()
            .withExpirationInDays(14).withStatus("Enabled");

    BucketLifecycleConfiguration lifecycleConfig =
        new BucketLifecycleConfiguration().withRules(expirationRule);

    amazonS3Client.setBucketLifecycleConfiguration(s3BucketName, lifecycleConfig);
  }

  return amazonS3Client;
}
Creating the bucket automatically upon the first initialization of the app is also taken care of, although that’s optional.
Creating an extended SQS client
This is the key step for enable large message handling. Basically we need an AmazonS3Client and an AmazonSQSClient and we covered that already how to create them.
protected SQSConnectionFactory createExtendedSQSConnectionFactory(SqsProperties sqsProperties) {
  AmazonS3 s3Client = createAmazonS3Client(sqsProperties);

  ExtendedClientConfiguration extendedClientConfig = new ExtendedClientConfiguration()
      .withLargePayloadSupportEnabled(s3Client, sqsProperties.getExtended().getS3BucketName());

  ProviderConfiguration providerConfiguration = new ProviderConfiguration();
  sqsProperties.getNumberOfMessagesToPrefetch()
      .ifPresent(providerConfiguration::setNumberOfMessagesToPrefetch);

  AmazonSQS sqsClient = createAmazonSQSClient(sqsProperties);

  return new SQSConnectionFactory(
      providerConfiguration,
      new AmazonSQSExtendedClient(sqsClient, extendedClientConfig)
  );
}
Thereafter these two are linked through AmazonSQSExtendedClient and ExtendedClientConfiguration provides a way to customize how large messages should be handled. By default, only messages larger than 256K will be sent over S3, but a user-defined message size threshold can also be specified. It’s also possible to configure it in a way that all of the messages go through S3 regardless of their size.
Conclusion
I read somewhere that Spring makes simple things easy and complex things possible. This assertion proved to be true on many occasions (including this one), when I was dealing with configuring a sophisticated application infrastructure with it.
It took me approximately a half day of tweaking to get every aspect SQS large message handling with JMS and Spring Boot right. Eventually difficulties stemmed from that fact that SQS is a bit different from other message queuing solutions. For example, as I mentioned earlier, it isn’t transactional, but Spring Boot – being an opinionated framework – tries to configure it that way, as most messages brokers are transactional.
So in conclusion I can say that this setup haven’t been working just fine for a couple of month in three applications using SQS with large messages.
Join my Newsletter
If you like Java and Spring as much as I do, sign up for my newsletter.